

Need a place to host a Halloween party but don’t have enough space? What about converting your garage into a party room or making it a Haunted House? I am embarassed to show the world how messy our garage was but watch how easily it can be converted into a useable space for Halloween. The converted space served as a dual purpose – after the party was over, we used it as a Haunted house for trick-or-treaters. It was a huge hit and the neighborhood kids look forward to it every year!
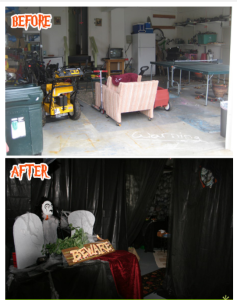
Our before and after pictures of our garage. Yes, my kids decided to warn others with chalk that entering into the garage was a hazard. Enter at your own risk! The garage was already scary looking to begin with!
Easy Halloween Garage Haunted House in 7 Steps
Makeover Plan – These are the basic steps to get started. The entire garage was set up in two days so you don’t need a whole lot of time or supplies.
- Step 1. Gather Supplies.
- Step 2. Clean up your garage.
- Step 3. Cover the walls and hide the junk.
- Step 4. Create interior rooms or divisions inside the garage.
- Step 5. Place Halloween decorations and props.
- Step 6. Lighting, sound and fog.
- Step 7. Enjoy!
OK, so let’s go through the steps in detail:
Step 1. Gather Supplies.
Here is what you will need:
- 1 Roll of cobblestone gossamer 60″ x 50 yard
- Optional for interior walls: 1 Roll of solid black gossamer 60″ x 25 yard
- Optional for interior walls: 1 Roll of Weedblock black landscape fabric (can also get from any garden store)
- Strips of wood in various length (any scrap slats you have leftover from previous projects or get from building supply store)
- Floral wire, heavy duty or Metal gauge wire, heavy duty
- Plastic wall anchors
- “O Hook” Wood Screw
Tools:
- Screwdriver, either electric or manual.
- Heavy duty stapler
- Hammer
- Scissors

Step 2. Clean up.
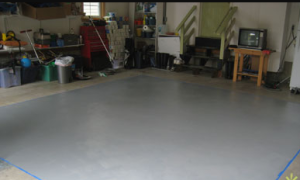 Picture 2. Clean up your garage. This one is an obvious one but clean up as much junk as possible. This is a good time to throw things away, donate items or have a garage sale! While I was at it, I decided to also repaint the concrete floor since it was full of art work and drawings from my kids and their friends from the previous summer. (We let each kid paint their own square with acrylics for some fun art time.) The garage is starting to look much better now, thank goodness!
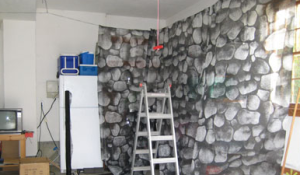
Step 3. Cover walls and hide all the junk.
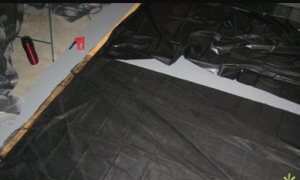
Picture 3. Cover the walls and hide the junk. Many of the items in our garage we actually did not have take out. Everything was tightly packed against the walls and a gossamer wall was used to cover the mess. More about this in our next picture. Any items too large to stay, remove from your garage. Now hang wire around the perimeter of your garage with the heavy duty metal wire. It doesn’t have to be exactly the same height or perfect. Remember, it will be dark and no one will notice.
Tip: The good thing about the wire is it’s fairly unobtrusive and “invisible” so you can leave it up until next Halloween. So you won’t have to set this one up again.
Picture 4. Gossamer Walls – Put up cobblestone gossamer walls by folding the fabric over the wire at the top and stapling it together. Gossamer comes in solid colors or patterned colors. It also comes in various widths and lengths. For our 2 car garage, one roll of gossamer 60″ wide x 50 yard length is enough to cover the walls completely. If you need extras to create interior walls or if you have a larger garage, order extra. It is light and airy so it won’t weigh down the top wire. This is all you need to hold up the walls for the perimeter of your garage. We set up the walls a few days before Halloween so whenever we needed stuff from behind the gossamer wall, we just pulled aside the curtain.
Length of fabric. The length of the cobblestone gossamer fabric should be about the same as the height from the top of your wire frame to the floor with about 3″ in hem allowance.
length of cobblestone gossamer = (height of wire frame + 3″)
Tip: Space the staples for the gossamer “hem” far apart so that when it’s time to put away all your decorations, gently pull off the staples from the gossamer and reuse for the following year!
Step 4. Create interior walls.
{Optional} This is an optional step if you want to have interior walls for your haunted house. Personally, I prefer at least several walls to create interest and to give me the ability to decorate different nooks and crannies. However, if you wish to leave your haunted house wide open, skip this step.
Picture 5. Create inside rooms. Now it’s time to get creative. Figure out how you would like the inside of your haunted house to look. Will it be a maze, or just have a few walls on the inside? Just remember, for every wall you add you will need a long strip of wood to start off with. If the wall is extra long use two or several strips of wood to form your wall. You will be basically hanging gossamer off these wooden slats, and hanging the slats from the ceiling with wires attached to “O hooks”. So after you have measured off the length for your wall and wooden slat, drill holes into the wood about 2 feet apart from each other. Since the wood and gossamer fabric is pretty light, you won’t need much support to hold up these walls. Screw the O hooks into holes that you just pre-drilled.

Picture 6. Black Gossamer. Turn the slats over and fasten black gossamer fabric using your heavy duty stapler on the other side of the wooden strip. Staple the entire strip. The length of the black gossamer fabric should be about the same as the height from the top of your wire frame to the floor with about 3″ in hem allowance.
length of black gossamer = (height of wire frame + 3″)
Picture 7. Layers of mystery. The black gossamer turned out pretty see through and not dark enough for my haunted house, so I added some black landscape fabric or Weedblock. I liked how it turned out with two layers of fabric since the Weedblock was too shiny so the gossamer gave it a soft gauzy effect, looked creepy especially when the wind blew, and gave the wall some movement.
Picture 8. Hang Walls. Drill a hole in the ceiling in the spot where you want to hang your gossamer wall. Line up the O hook you will be putting in the ceiling with the O hook on your wooden slat. Insert plastic wall anchors and then screw in O hooks into the ceiling hole. Loop through some floral wire or metal wire through the O hooks and tie off securely. Loop the other end of the wire through the O hook of the wooden slat. Tie off and secure. Continue doing this until the entire wall is up and hanging. (see picture).
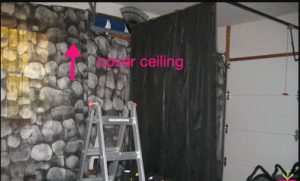
Ceiling. {Optional} Once the interior walls are up you can hang several drapes of leftover gossamer from gossamer wall to gossamer wall so the ceiling is not so white and blends in with the rest of the haunted house. What I did was cut up some gossamer into strips and hung them from wall to wall. It creates the same illusion of a ceiling but you don’t need to use as much material.
Step 5. Halloween props and decorations.

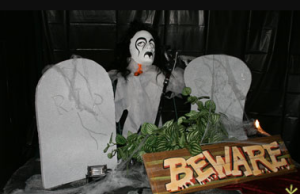
Picture 9. Props. Now it’s time for the fun part! Set up props as you wish in various corners, rooms and heights. Yes, don’t forget the ceiling as well. Any which way to haunt and surprise visitors. Spiders, ghosts and flying bats are great props for the ceiling!
Step 6. Lighting, sound and fog:
Picture 10. Lighting. Don’t forget about lighting. Lighting can create a dramatic effect without much effort. Up lights, spot lights, flicker lights, electric candles, strobe lights, black lights, etc. all work well.
Picture 11. Music. Music also adds to the drama and scare factor as visitors enter the dark room and don’t know what to expect.
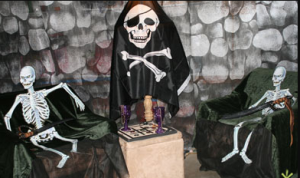
The two old chairs in the first picture were draped with old curtains and plopped a few skeletons on top. A big pirate flag covered a lamp that was too pretty. This room became one of the favorite hangouts.
Picture 12. Fog. Add a fog machine to make things more mysterious.
This is the bar area. A temporary bar was made out of two metal planters and a wooden door. Just place some more black garden weedblock on it and cover.
Step 7. Enjoy!
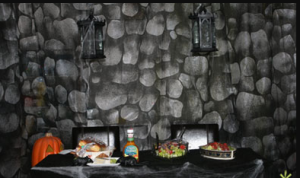
Picture 13. Food table. We set up the food on a temporary buffet table. Hung two iron chandeliers from the ceiling with candles in them.
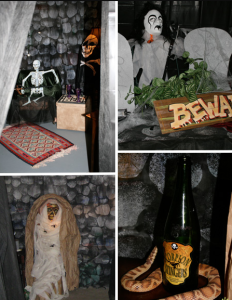
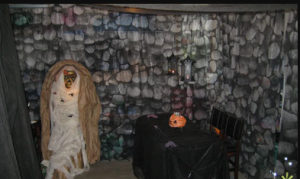
Picture 14. Top left. Entrance to the haunted house. Top right. More props at the entrance. My brother would then pop out from behind the wall at the entrance and scare everyone since most are just staring at the mask and display so they are caught off guard! Bottom left. I received a shipment from Shindigz for the gossamer (long box) and used it to make a coffin and mummy. Just drape a whole bunch of gauze strips in the center, place a mask on top and add lights under the gauze to make it shine through and look ghostly. Stood up the mummy for more visual height and to create more of an impact. Bottom right. Used bottle labels from Michaels craft stores to dress up the bottles and added some snakes as decoration.
Usable Space. When the entire garage was finished it felt so good! We have never seen our garage so clean before and we actually enjoyed hanging out in the garage! Neighbors and friends would come over and it became a fun gathering place. It was as if we added a large entertainment room to our house and one where we didn’t have to worry about spilled drinks or crumbs on the floor! Gotta love that!
Easy Storage. The best thing about the gossamer is that it lasts for several Halloweens. We’ve had ours for 3 years and it is still holding up. I gently pull them off the top wire frame being careful not to tear them, and just fold away and store for next year. It folds flat and compact and does not take up a lot of space. What’s left standing is the wire frame that can just be left up for the next year.
Hope you’ve enjoyed my haunted house set up and would love to see yours!
Happy Halloween!


